
The software available for download from this site is provided free of charge without any warranty as to its proper functioning. The user may install and use the software solely at their own risk. Under no circumstances shall the software’s author be held liable for any damages arising from the use of the software.
To date, it's not known about problems caused by the installation or use of the Updated Italian Keyboard driver. If it were to occur, even for small incompatibilities between keystrokes in specific programs, please give notice to the author.
If the driver is already installed on your system and you want to update it, you have first to uninstall it.
In order to check whether the Updated Italian keyboard driver is already installed on your computer, or to check its version, open the Programs and Features settings page. It will be shown a list of installed programs. Among them, find “Tastiera Italiana Aggiornata” and, next, its version number.
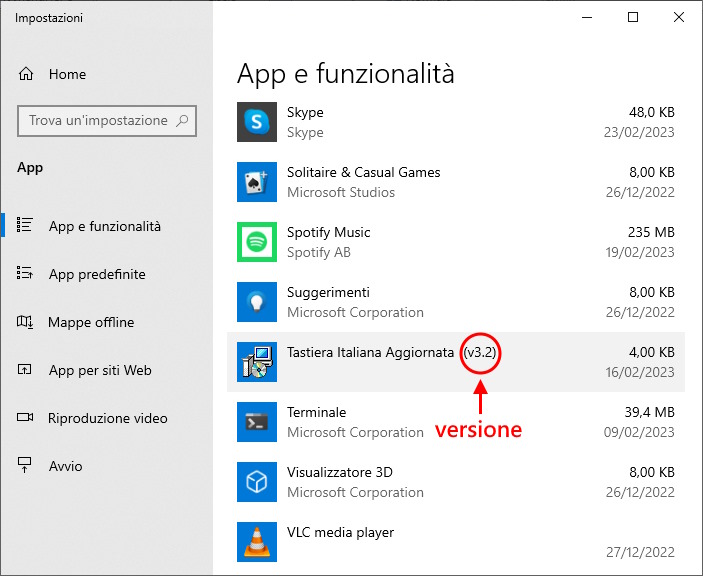
Version of the Updated Italian Keyboard driver
If the row «Tastiera Italiana Aggiornata» is missing, it means that the driver is not installed on your computer.
To install or uninstall the driver, follow the instructions below.
Updated Italian Keyboard driver is currently available for Microsoft Windows™ 64-bit operating systems (11 / 10 / 8.1 / 8 / 7), and can be downloaded here for free:
Save the archive kbdit_x.zip in a download folder, then click one of the below buttons to show a guide for installation, or uninstallation, suitable to the OS of your computer.
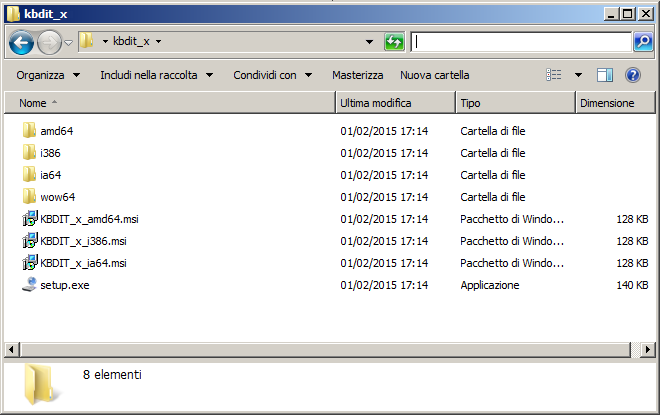
Extract content of kbdit_x.zip. The folder kbdit_x will be created with the following content:
Double-click setup.exe.
Authorization is requested to modify the user’s account:

Click Yes.
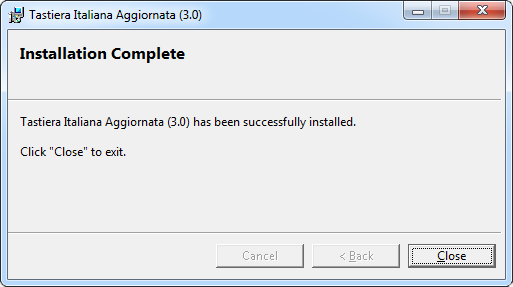
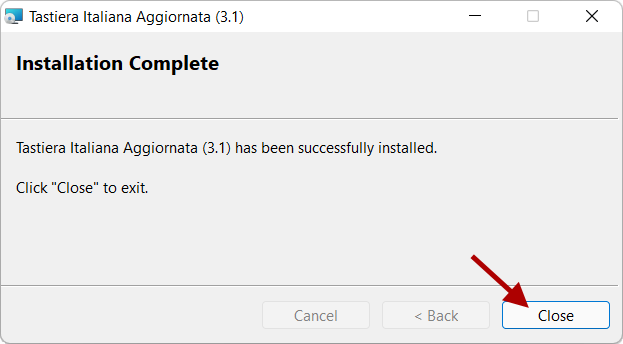
The driver is then installed in a few seconds. Then, the message of successful installation is shown:
Click Close.
You can now delete the temporary folder from where you launched the installation, if you like.
It now proceeds to set the Updated Italian keyboard as default keyboard.
After the driver of the Updated Italian Keyboard installed, in the Windows status bar will be shown a language selector. With it, you can switch at any time between the Updated Italian Keyboard and the previous keyboard.

Usually, this setting takes effect only on the application in use at the time of selection. Quitting the application, the system restores the default keyboard layout.
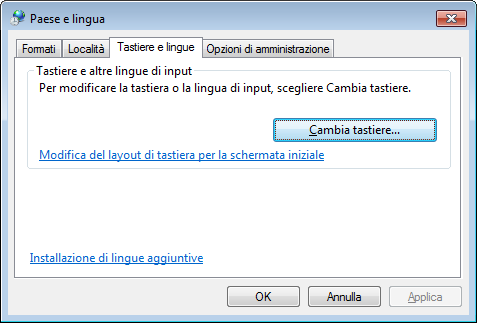
The default keyboard is the one that is activated automatically when Windows starts. If you installed the Updated Italian Keyboard driver, maybe you like to set it as the default keyboard. Here it is how to do.
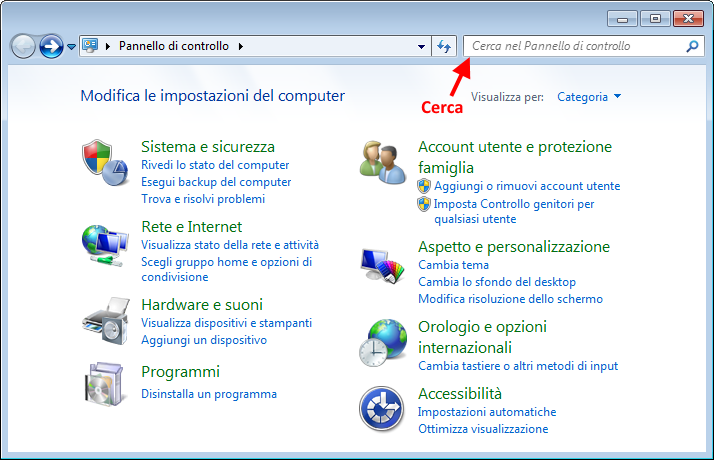
Click the Start button and then click Control panel.
In the search box, input “change keyboard” and, among the search results, click Change keyboards or other input methods.
In the Keyboards and Languages tab, click Change keyboard.
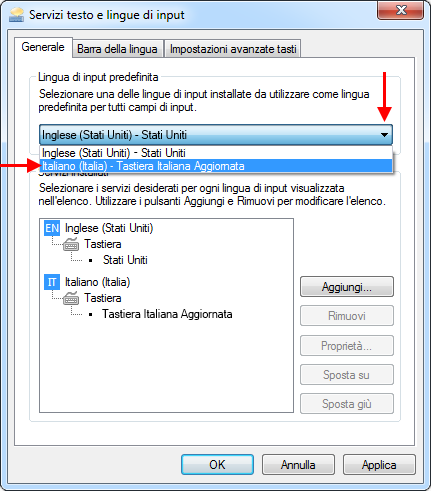
In the list Default input language select Tastiera Italiana Aggiornata:
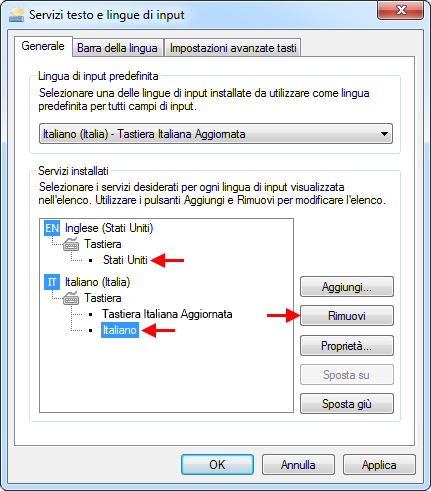
In the dialog for selection of the input methods, select any input method except for Tastiera Italiana Aggiornata, and click Remove for each.
At the end, only Tastiera Italiana Aggiornata is left:
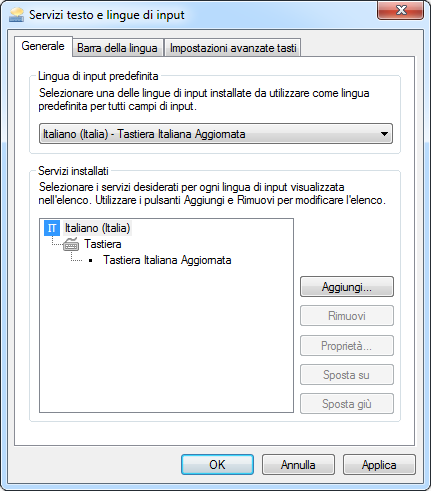
Click Apply and OK.
Note: Removing the unused input methods from the above dialog does not cause them to be uninstalled from your PC. In fact, just press the button Add instead of Remove to show the whole list of keyboard drivers installed on your system, where you will notice still be present the removed ones, among many others. Then select the desired methods to make them appear again to the above dialog. In fact, this must be done in case you want to remove the driver of Updated Italian Keyboard for restoring the old keyboard(s).
Reboot your PC.
Extract content of kbdit_x.zip. The folder kbdit_x will be created with the following content:
Double-click setup.exe.
Authorization is requested to modify the user’s account:
Click Yes.
The driver is then installed in a few seconds. Then, the message of successful installation is shown:
Click Close.
You can now delete the temporary folder from where you launched the installation, if you like.
It now proceeds to set the Updated Italian keyboard as default keyboard.
After the driver of the Updated Italian Keyboard installed, in the Windows status bar will be shown a language selector. With it, you can switch at any time between the Updated Italian Keyboard and the previous keyboard.
Usually, this setting takes effect only on the application in use at the time of selection. Quitting the application, the system restores the default keyboard layout.
The default keyboard is the one that is activated automatically when Windows starts. If you installed the Updated Italian Keyboard driver, maybe you like to set it as the default keyboard. Here it is how to do.
Press the Windows logo key + X to display a list of commands and options.
Click Control Panel, or Settings.
In Clock, Language and Region click Change input methods:
Click Advanced settings:
Select Tastiera Italiana Aggiornata as Default input method:
Click Save.
Reboot your PC.
Right-click on kbdit_x.zip to open an option menu, and choose Extract all….
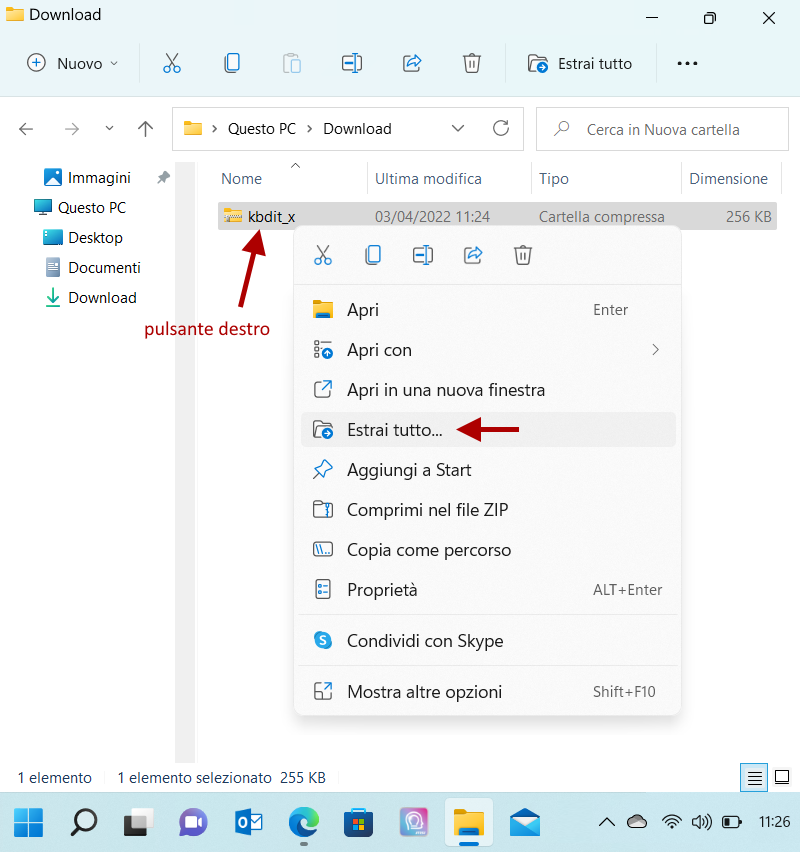
The folder kbdit_x will be created with the following content:
Double-click on setup.exe.
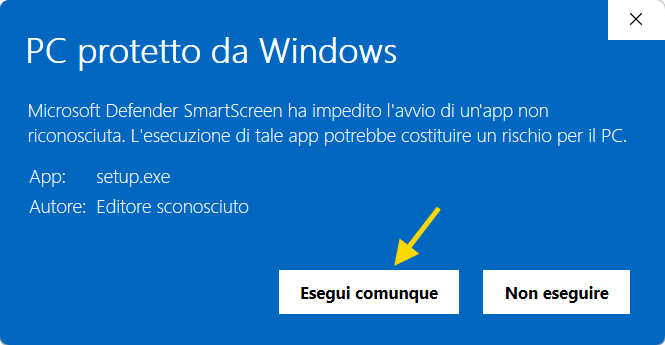
Depending on your computer settings, a warning message could be shown:
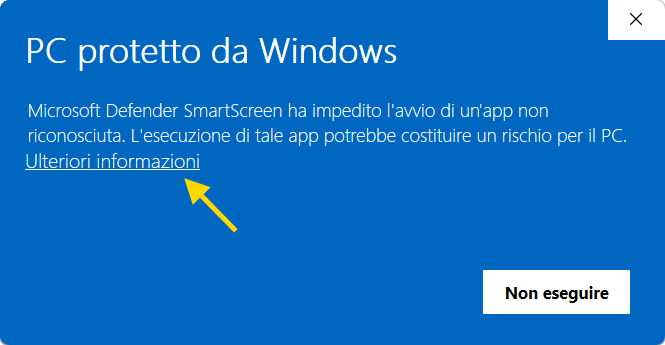
Click More info then Run anyway:
Depending on your computer settings, an authorization could be requested to modify the user’s account (it may happen that this dialog is hidden by other foreground windows):
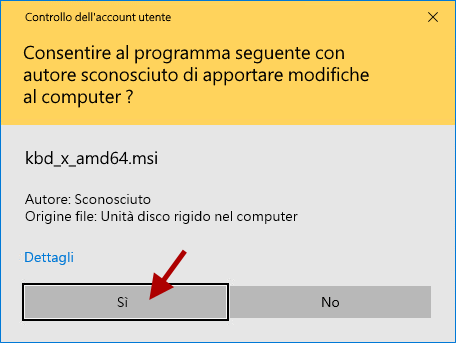
Click Yes.
The driver is then installed in a few seconds. Then, the message of successful installation is shown:
Click Close. You can now delete the temporary folder from where you launched the installation, if you like.
It now proceeds to set the Updated Italian keyboard as startup keyboard.
After the driver of the Updated Italian Keyboard installed, in the Windows status bar will be shown a language selector. With it, you can switch at any time between the Updated Italian Keyboard and the previous keyboard.

Usually, this setting takes effect only on the application in use at the time of selection. Quitting the application, the system restores the previous keyboard.
Windows comes with a large number of pre-installed keyboard drivers. The operation just carried out simply added another to that number. Among them, the keyboard that is activated automatically when Windows starts is said the startup keyboard. If you installed the Updated Italian Keyboard driver, maybe you like to set it as the startup keyboard. Here it is how to do.
Press the Windows logo key + X to display a list of commands and options, then click Settings:
Choose Time & Language then Language and Region:
Find the box with language settings and click the three dots to open a menu and choose Language options:
You should already see the Updated Italian Keyboard among the startup keyboards, as shown below. Click on the three dots of your previous keyboard and choose Remove:
Don't worry: removing it from this list does not delete the keyboard driver from your computer. It just defines your startup keyboard. In fact, all keyboard drivers installed on your computer are always available in the list that appears by clicking "Add a keyboard".
At the end, your language settings should be like that:
Reboot your computer.
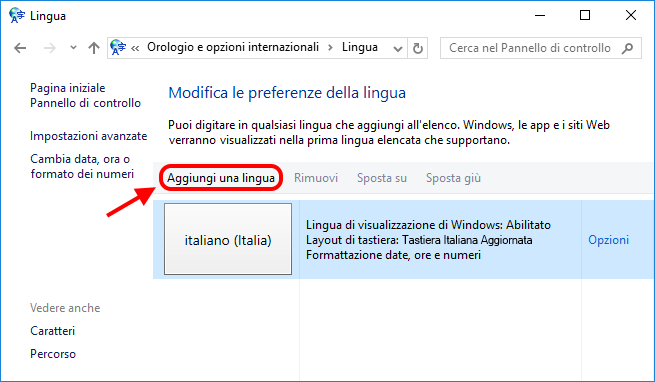
The default keyboard (default input method) is the one that is activated automatically when Windows starts. If Tastiera Italiana Aggiornata is the default keyboard on your PC, you have to assign another type of keyboard as default keyboard before to uninstall Tastiera Italiana Aggiornata. Here it is how to do.
Click the Start button and then click Control panel.
In the search box, input “change keyboard” and, among the search results, click Change keyboards or other input methods.
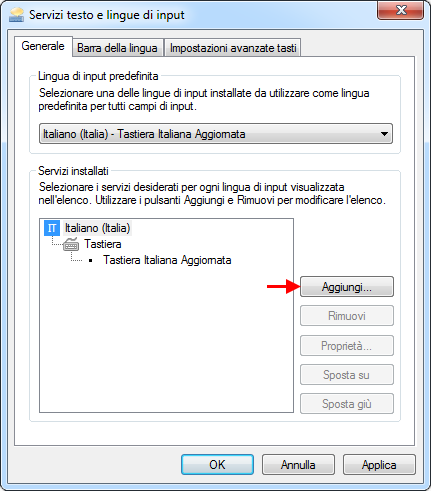
In the Keyboards and Languages tab, click Change keyboard.
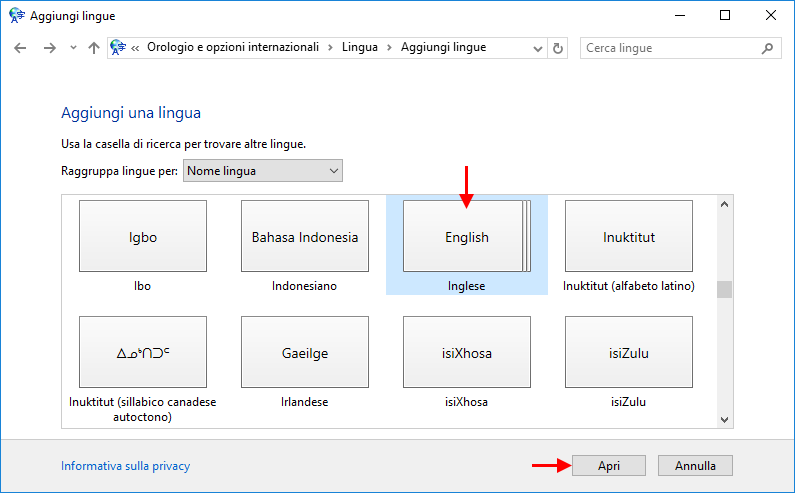
If, as in this example, the keyboard you want to use as new default keyboard does not appear in the Installed Services pane, press the Add button to show the complete list of the keyboards available in the system:
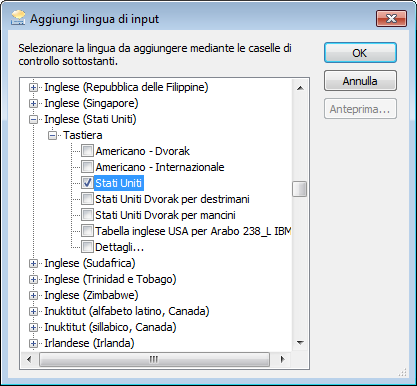
The complete list of the keyboards available in the system is shown. Look for, then select, the keyboard that you like to set as default one – e.g. “English (USA)” – then press Ok:
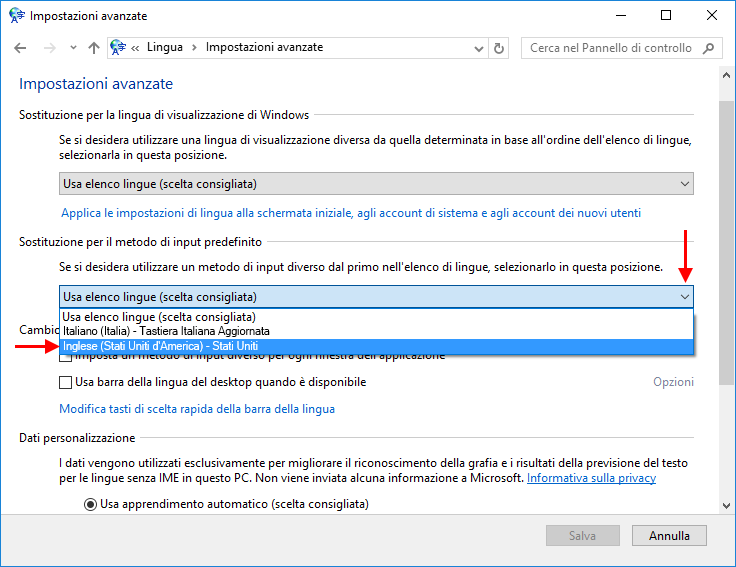
In the list Default input language select the new default keyboard:
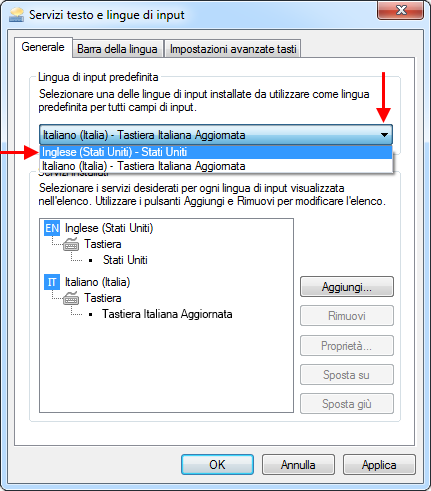
In the dialog for selection of the input methods, select Tastiera Italiana Aggiornata, and click Remove:
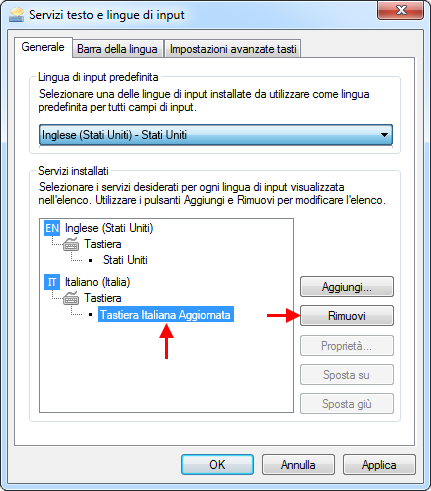
Click Apply and OK.
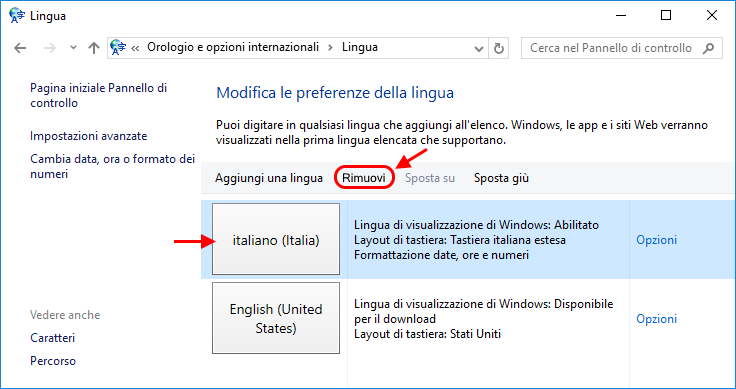
Actions applied so far are enough for your system to start with the new keyboard. Anyway, if you want to completely uninstall the Updated Italian Keyboard driver, for example because you want to update it with a newer version, do the following step.
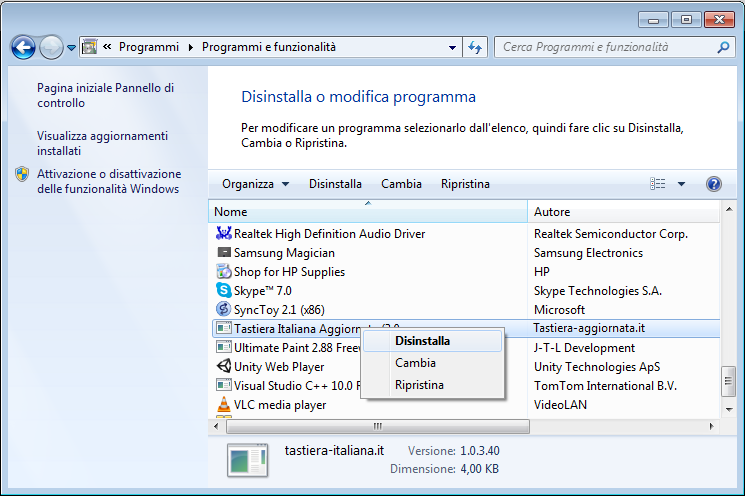
Then start Control panel and click Programs and Programs and Features.
You will be shown the list of installed programs. Among them, identify “Tastiera italiana Aggiornata” then right-click it and choose Uninstall.
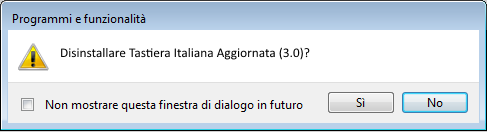
Before uninstalling the driver, the system asks for confirmation: click Yes.
Reboot the PC.
The Updated Italian Keyboard driver is now completely uninstalled.
The default keyboard (default input method) is the one that is activated automatically when Windows starts. If Tastiera Italiana Aggiornata is the default keyboard on your PC, you have to assign another type of keyboard as default keyboard before to uninstall Tastiera Italiana Aggiornata. Here it is how to do.
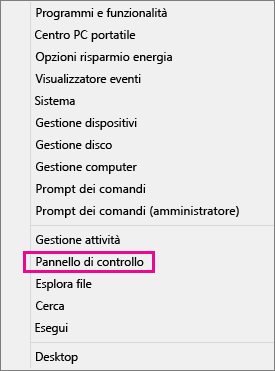
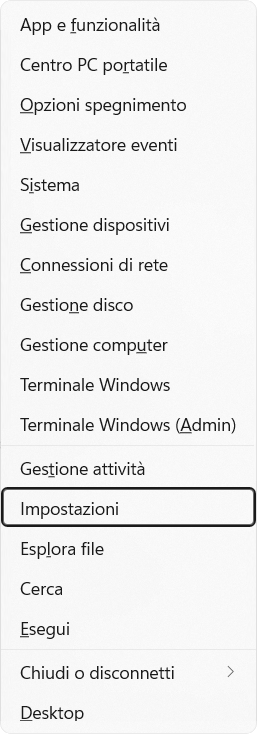
Press the Windows logo key + X to display a list of commands and options.
Click Control Panel.
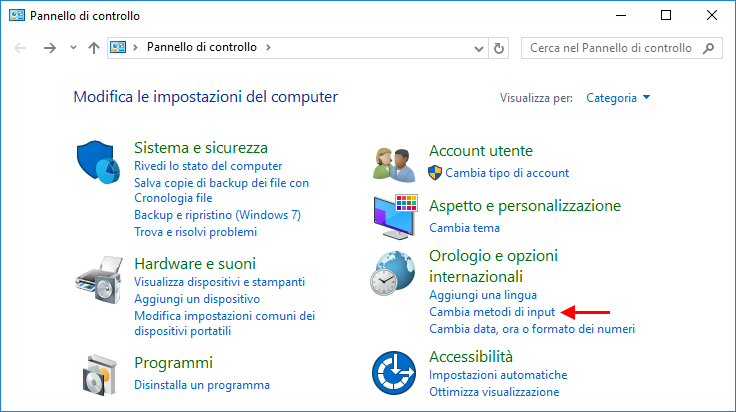
In Clock, Language and Region click Change input methods:
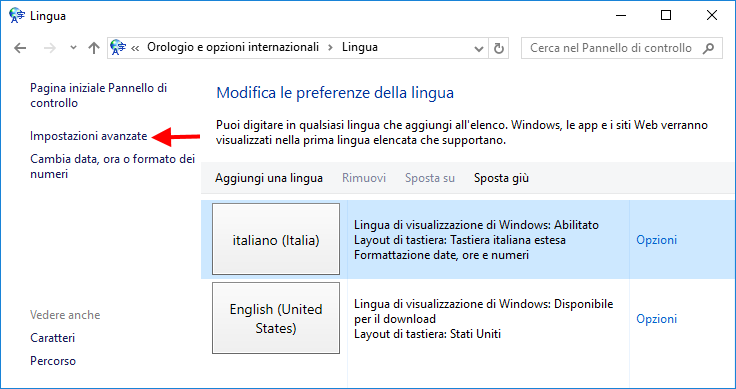
If, as in this example, the keyboard you want to use as new default keyboard does not appear in the list, press the Add button to show the complete list of the keyboards available in the system:
The complete list of the keyboards available in the system is shown. Look for, and select, the keyboard, that you like to set as default one, then press Open, or Add:
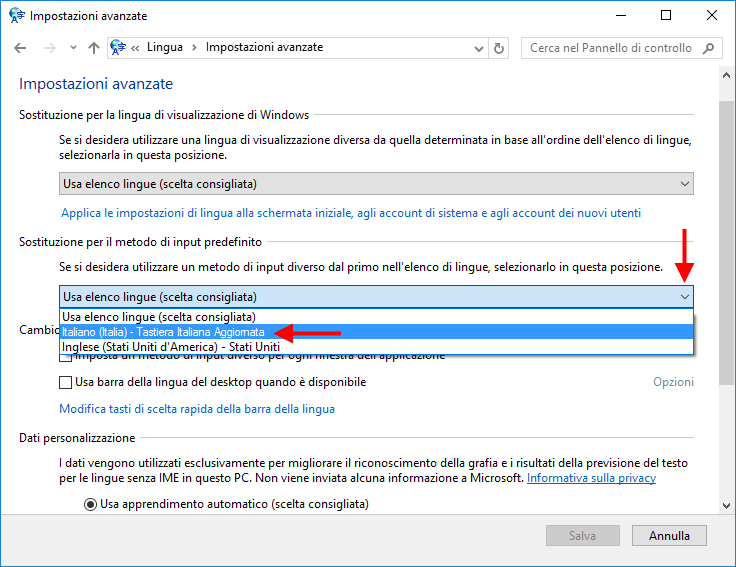
Back to the previous dialog, the list now actually shows the keyboard that you will set as default. So, click Advanced settings:
Select the new keyboard as Default input method:
Click Save.
Again from the previous dialog, remove “Italian” from the languages loaded at system startup:
Actions applied so far are enough for your system to start with the new keyboard. Anyway, if you want to completely uninstall the Updated Italian Keyboard driver, for example because you want to update it with a newer version, do the following step.
Then start Control panel and click Programs and Programs and Features.
You will be shown the list of installed programs. Among them identify “Tastiera Italiana Aggiornata” then right-click it and choose Uninstall.
Before uninstalling the driver, the system asks for confirmation: click Yes.
Reboot the PC.
The Updated Italian Keyboard driver is now completely uninstalled.
Uninstallation takes place in two steps: setting the new startup keyboard instead of the Updated Italian keyboard and, optionally, removing the Updated Italian Keyboard driver from the system.
The startup keyboard is the one that is automatically activated when Windows starts. If the startup keyboard is the Updated Italian Keyboard, you need to choose another one before you can uninstall it. Below are the instructions to set the desired keyboard in place of the Updated Italian Keyboard.
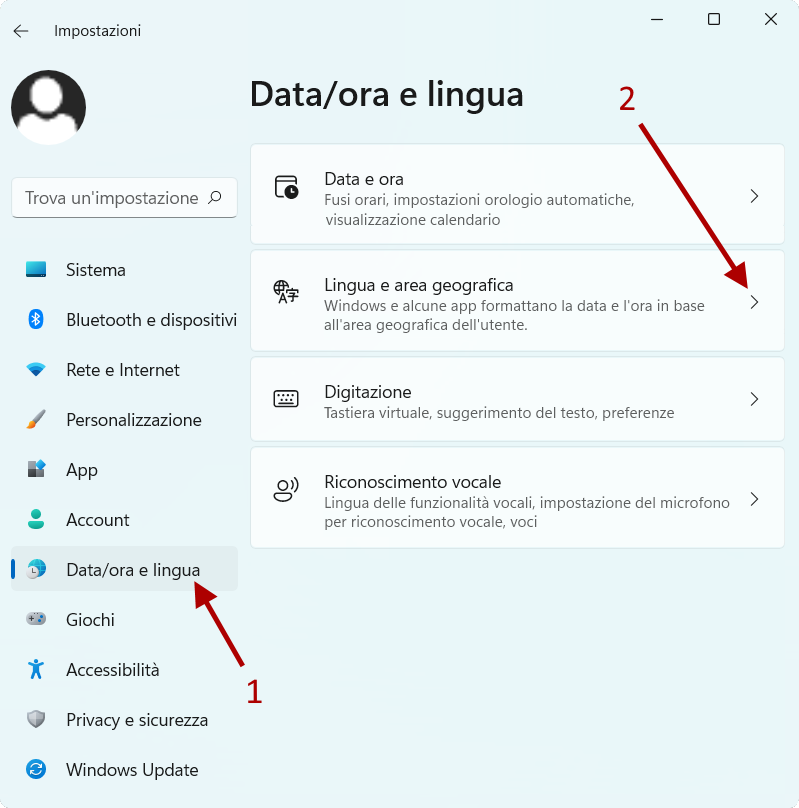
Press the Windows logo key + X to display a list of commands and options, then click Settings:
Choose Time & Language then Language and Region:
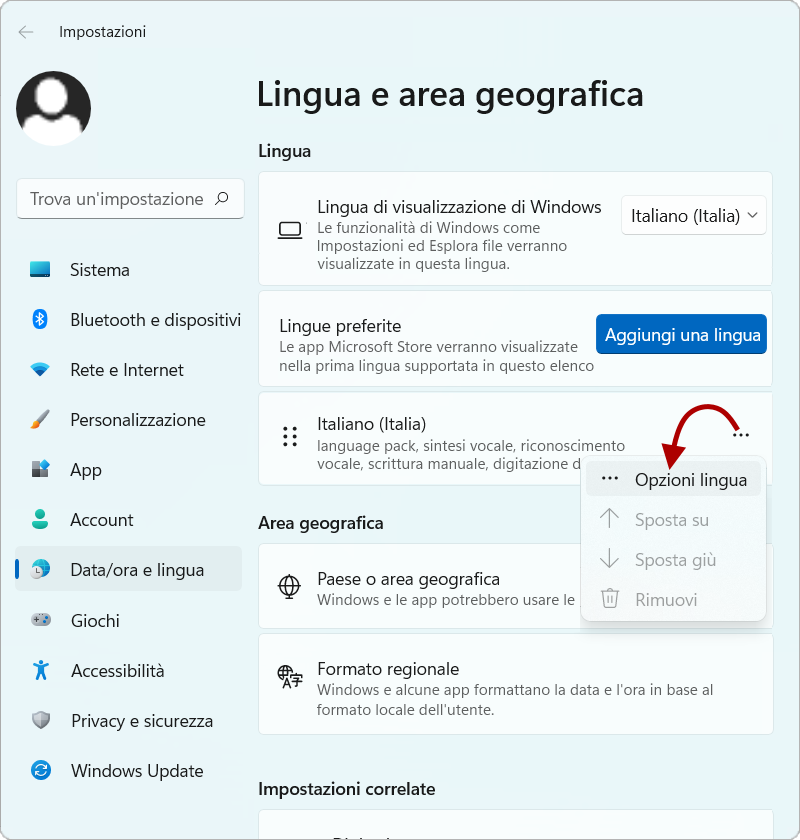
Find the box of current language and click the three dots to open a menu and choose Language options:
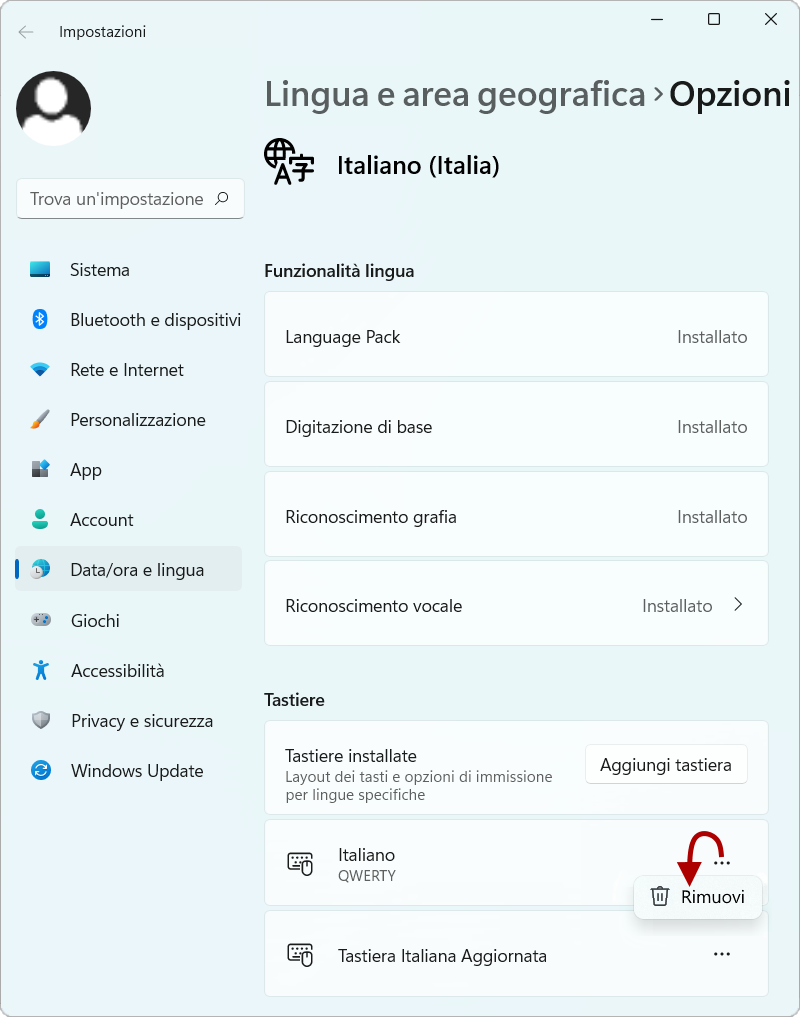
Find the “installed keyboards” box and click Add a keyboard to open a list of available keyboard drivers. From such a list choose your preferred keyboard (in this example, “Italian”):
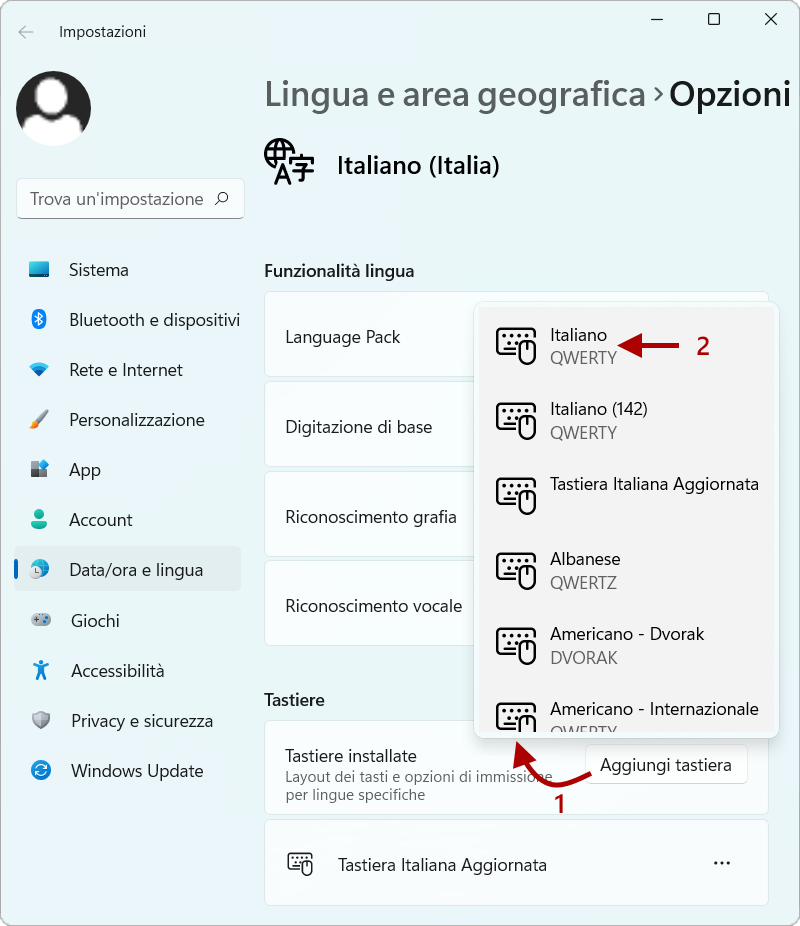
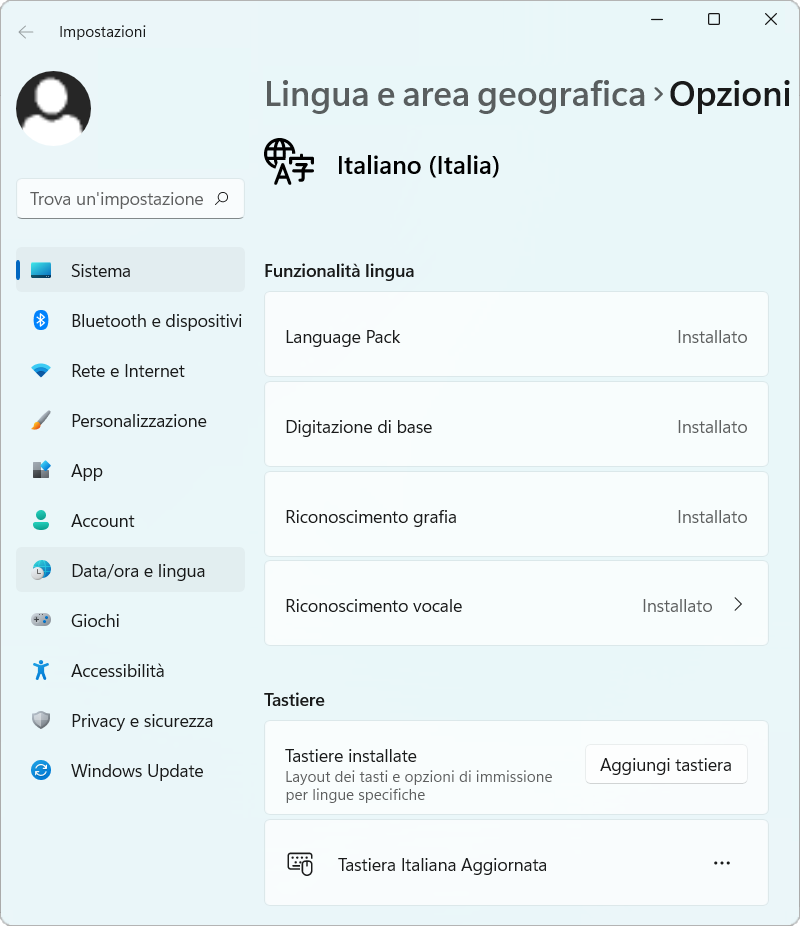
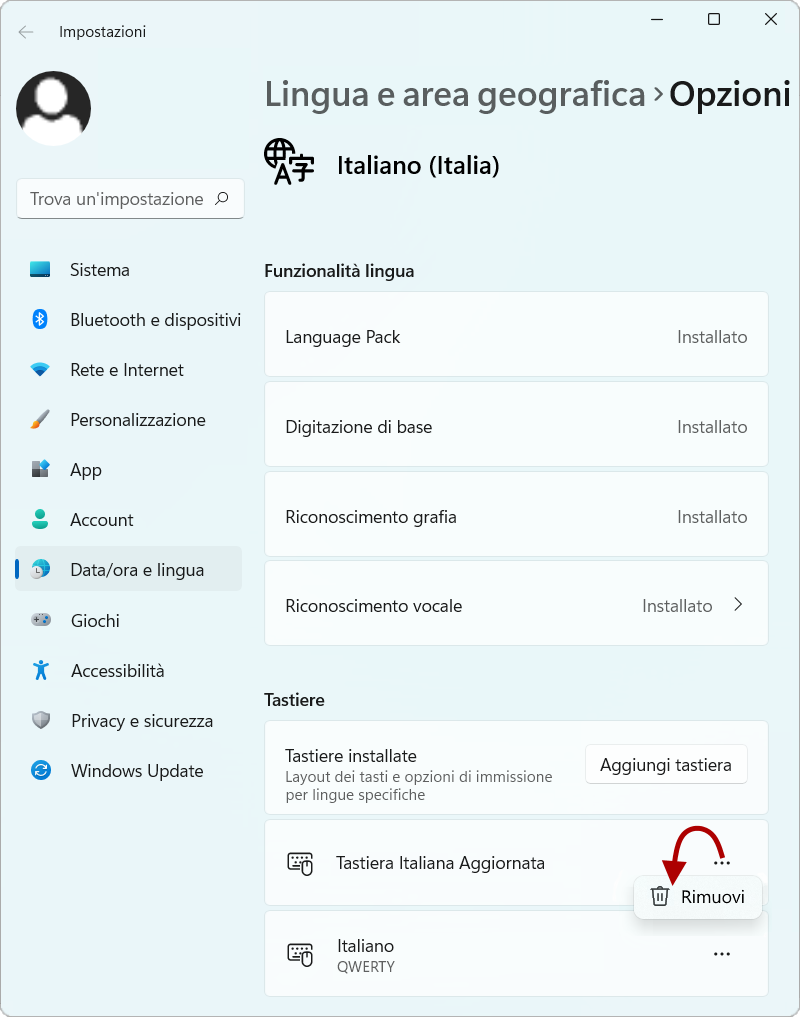
The new keyboard will be shown below. Click the three dots of «Tastiera Italiana Aggiornata» and choose Remove:
Actions applied so far are enough for your system to start with the new selected keyboard. Anyway, if you want to completely uninstall the Updated Italian Keyboard driver, for example because you want to update it with a newer version, do the following step.
Press the Windows logo key + X to display a list of commands and options, then click Settings:
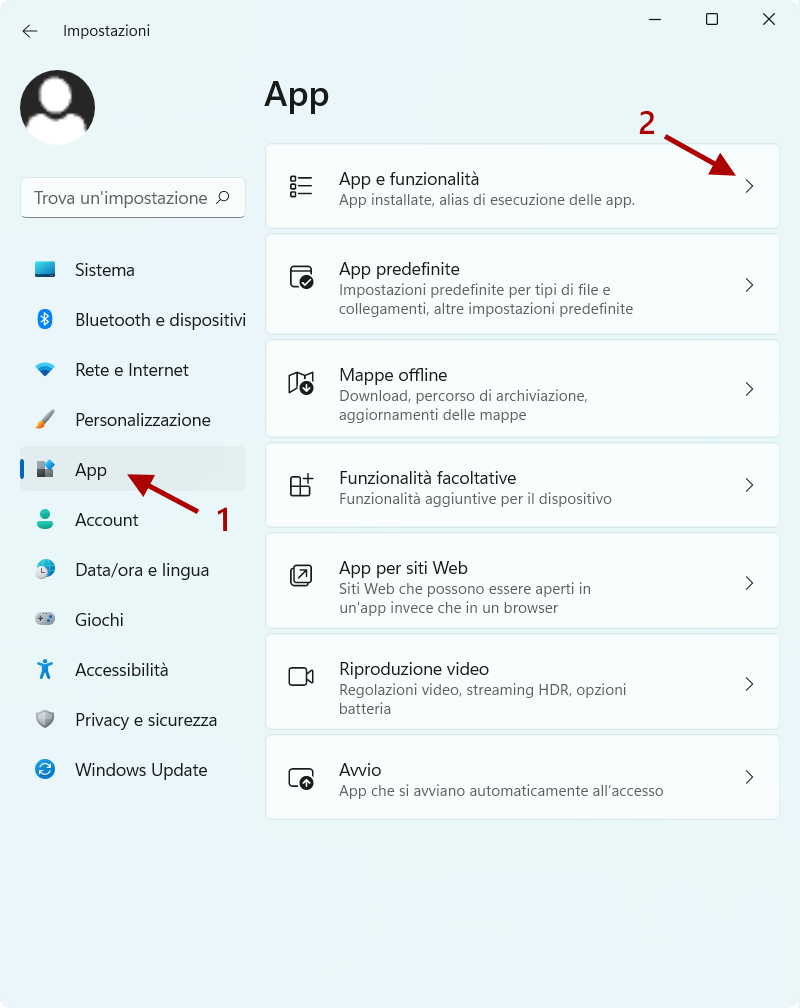
Choose Apps, then Apps & features:
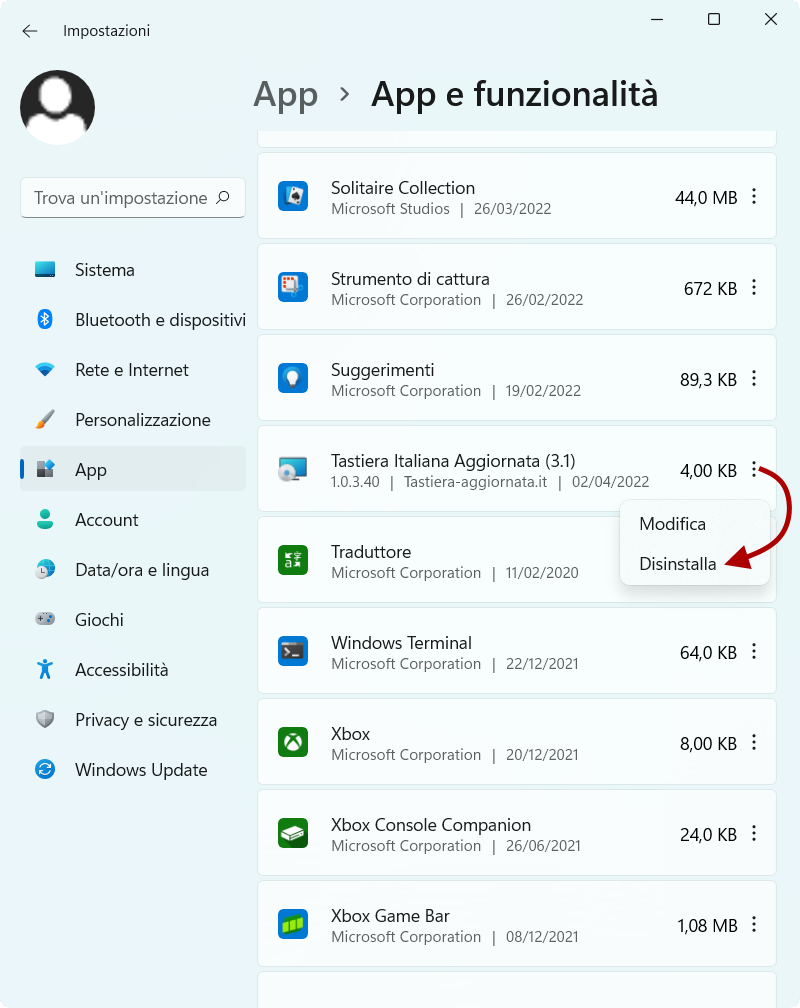
You will be shown the list of installed programs. Among them find “Tastiera Italiana Aggiornata” and click the three dots then Uninstall.
Before uninstalling the driver, the system asks for confirmation: click Yes.
Reboot the PC.
The Updated Italian Keyboard driver is now completely uninstalled.